
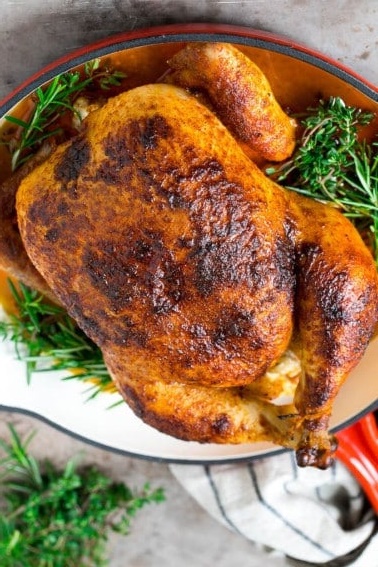
Rotisserie chicken
Nothing beats the juicy, tender, and flavorful experience of rotisserie chicken. Whether it’s served with sides at a family dinner or shredded for tacos, sandwiches, or salads, this versatile dish is a favorite in many households. The good news is that making rotisserie chicken at home doesn’t require a fancy machine or a lot of effort. With just a few simple ingredients and some patience, you can recreate the classic rotisserie chicken experience right in your kitchen.
Here’s a detailed step-by-step guide to help you make the perfect homemade rotisserie chicken.
Ingredients
- 1 whole chicken (about 4-5 lbs)
- 2 tbsp olive oil or melted butter
- 1 tbsp kosher salt (or to taste)
- 1 tsp black pepper (or to taste)
- 1 tbsp garlic powder
- 1 tbsp onion powder
- 1 tsp smoked paprika (or regular paprika)
- 1 tsp dried thyme (or fresh if you prefer)
- 1/2 tsp dried rosemary (optional)
- 1 lemon, halved
- 1 onion, quartered (optional)
- 3-4 garlic cloves, smashed (optional)
- Fresh herbs like rosemary or thyme (optional)
Tools
- Roasting pan or large baking dish
- Meat thermometer
- Kitchen twine (for trussing the chicken, optional)
- Basting brush (optional)
Step 1: Prepare the Chicken
Start by removing any giblets from the chicken (they are usually found in the cavity). Rinse the chicken under cold water and pat it dry with paper towels. Drying the chicken is crucial for achieving that crispy, golden skin.Once the chicken is dry, place it on a clean surface like a cutting board. Tuck the wings behind the back of the chicken to prevent them from burning during cooking. If you prefer, you can use kitchen twine to tie the legs together to ensure even cooking.
Step 2: Season the Chicken
Generously rub the chicken with olive oil or melted butter, ensuring it’s evenly coated. The oil or butter helps the skin crisp up as it cooks, while also enhancing the flavor.Next, sprinkle the chicken with kosher salt, black pepper, garlic powder, onion powder, paprika, dried thyme, and rosemary. Make sure to coat both the inside and outside of the chicken. If you want, you can stuff the cavity with aromatics such as halved lemon, onion quarters, garlic cloves, or fresh herbs. These will infuse the chicken with additional flavor as it roasts.
Step 3: Truss the Chicken (Optional)
While trussing (tying the chicken’s legs and wings with twine) isn’t strictly necessary, it can help ensure that the chicken cooks evenly. To truss the chicken, tie the legs together with a piece of kitchen twine, and if you like, tie the wings against the body. This step helps to keep the chicken compact and improves the presentation once it’s done.
Step 4: Preheat the Oven
Preheat your oven to 425°F (220°C). This high temperature helps crisp up the skin while keeping the meat juicy and tender. Some ovens may require a little longer to preheat, so plan for about 10 minutes of waiting.
Step 5: Roast the Chicken
Place the chicken on a roasting rack in a roasting pan or large baking dish, breast-side up. The roasting rack is key because it allows air to circulate around the chicken, ensuring even cooking.Put the pan in the preheated oven. Roast the chicken for about 1 hour and 15 minutes, or until the internal temperature reaches 165°F (75°C) when measured at the thickest part of the breast. If you don’t have a meat thermometer, you can check by piercing the thigh – the juices should run clear, not pink.During roasting, you may choose to baste the chicken once or twice with the pan juices. This step is optional but can help keep the skin moist and flavorful.
Step 6: Check for Doneness
At the 1-hour mark, start checking the temperature of the chicken. A meat thermometer inserted into the thickest part of the breast should read 165°F (75°C). If it’s not quite there yet, continue roasting and checking every 10 minutes.Once the chicken reaches the desired internal temperature, take it out of the oven and let it rest for about 10-15 minutes. Resting allows the juices to redistribute throughout the chicken, making it even more tender.
Step 7: Carve and Serve
After resting, carve the chicken by slicing along the breastbone, and then cutting the thighs and legs off. You can shred the chicken if you plan to use it in tacos or soups, or serve it in whole pieces with your favorite sides.
Tips for Success
- Dry the Chicken Well: Moisture on the skin will prevent it from becoming crispy. Pat the chicken dry with paper towels before seasoning.
- Use a Meat Thermometer: This ensures the chicken is cooked perfectly and avoids overcooking, which can dry out the meat.
- Let the Chicken Rest: Giving the chicken some time to rest before carving ensures it remains juicy and flavorful.
- Experiment with Flavors: Don’t be afraid to add different spices, herbs, or even a marinade to the chicken to customize the flavor.
Serving Suggestions:
- Rotisserie chicken can be served with a variety of side dishes. Here are some ideas:
Mashed Potatoes or Roasted Potatoes Grilled Vegetables like asparagus, zucchini, or bell peppersA fresh salad with mixed greens, tomatoes, and avocadoRice Pilaf or a warm grain saladHomemade garlic bread or warm dinner rolls
Why Make Rotisserie Chicken at Home?
Making rotisserie chicken at home not only saves you money compared to buying it from the store, but it also allows you to customize the seasoning and control the cooking process. Plus, it fills your home with the mouthwatering aroma of roasting chicken.
Homemade rotisserie chicken is also a great option for meal prep. You can use the leftovers in soups, sandwiches, wraps, or even chicken salads. The possibilities are endless!
Homemade rotisserie chicken is a comforting, satisfying dish that’s surprisingly easy to make. With just a few ingredients and minimal effort, you can enjoy a delicious meal that’s full of flavor. So, the next time you crave rotisserie chicken, try making it yourself – your taste buds (and your wallet) will thank you!

[…] How to Make Rotisserie Chicken at Home: A Step-by-Step Guide. […]
Multibet88play is a solid option. I appreciate the clear layout and easy access to different games. Deposit and withdrawal options are good too. Definitely worth checking out if you’re looking for something new: multibet88play
F8betceo, been hearing some buzz. Checking it out now. Seems legit and the games look pretty slick. Hope my luck is in tonight! Gotta say, the site loads fast too. f8betceo
Can you be more specific about the content of your article? After reading it, I still have some doubts. Hope you can help me. https://accounts.binance.com/ru/register?ref=O9XES6KU
Downloading the 22jlloginapp now. The interface looks clean. Hopefully, the gameplay is good too! Access it here: 22jlloginapp
Win88apps, downloading now, hoping to win! Wish me luck, guys! Try those apps: win88apps
Những điểm ấn tượng chỉ có tại nhà cái 888slot . TONY01-09
Thanks for sharing. I read many of your blog posts, cool, your blog is very good.
Thanks for sharing. I read many of your blog posts, cool, your blog is very good.
I don’t think the title of your article matches the content lol. Just kidding, mainly because I had some doubts after reading the article.
Your article helped me a lot, is there any more related content? Thanks! https://www.binance.info/register?ref=IHJUI7TF